Wednesday, May 27, 2009

Reliving my Childhood

Growing up, some of my most vivid memories are of visiting my grandparents in Puerto Rico. Waking up in my grandmother’s house, it wasn’t unusual to be up at 6:30 a.m. (which may explain my present early bird tendencies) with the smell of strong, Spanish coffee brewing, and the warm tropical breeze coming in through the windows. My sisters and I would join my mom and grandparents out on the front porch, as they sipped their coffee, and I almost inevitably, would train my eyes to the ground, looking for a lizard, coqui (the tiny tree frogs that are indigenous to the island), or even just a really cool bug- I was always fascinated by the tiny creatures that sent chills down my mom and grandmothers spines. But that’s what I remember, the pungent tropical air, while relaxing on the porch.

Today, I relive those memories by sitting out on my fire escape, sipping an iced latte (made with that same, stong Bustelo coffee), the air scented with the fragrance wafting from my container herb garden. Last year, I only grew basil and parsley. This year, I decided to take it a bit further and add chives, rosemary, dill, purple basil, and scallions. My plants are still small, but they are growing vigorously, and I’ve been taking clippings from them regularly to use when I cook.

The other night, Angie was over for dinner, and I was trying to come up with something that I could make pretty quickly. I toyed with a few ideas, and finally settled on grilling (yes, I got a grill!) some cumin rubbed tilapia along with veggie packets, and made herbed couscous on the side. And yes, I used fresh herbs from my little garden to make it!

As a side note, I don’t quite get what couscous is, exactly. A quick Google search tells me it’s coarsely ground semolina pasta… but it’s not something I ever ate growing up… In fact, I think the first time I ever had it was a few months ago, making dinner with my mom at her house. I just found a recipe online and went with it. But, I like it. I make it with chicken stock, onions, carrots, celery, rosemary, and dill.

HERBED COUSCOUS
  • 1/3 cup each chopped carrots, celery and onions
  • extra virgin olive oil
  • 3/4 cup instant couscous
  • 1 cup chicken stock
  • 1 T chopped fresh rosemary
  • 1 T chopped fresh dill
  • salt and pepper, to taste

Coat the bottom of a medium sized pot with olive oil over medium heat and added the chopped vegetables.
Once they are tender, add the chicken stock, season with salt and pepper, and bring to a boil. Add the fresh herbs and couscous, and remove from heat. Let it sit covered for five minutes, then fluff with a fork.

CUMIN GRILLED TILAPIA
  • 2 tilapia filets (I usually get the ones that are individually frozen in a bag of about 6)
  • extra virgin olive oil
  • salt and pepper
  • 1 T cumin
  • 1 T chopped fresh parsley

Drizzle each filet with olive oil, then season each side with salt and pepper, cumin, and parsley. Grill on foil or a grill topper over medium heat for about 4-5 minutes on each side, until fish is opaque and will flake with a fork.


GRILLED VEGGIE PACKETS
  • 1 cup raw vegetables, your choice (I used a frozen mix of green beans, wax beans, and carrots)
  • extra virgin olive oil
  • 2 slices of turkey bacon, cooked to a crisp and crumbled
  • salt and pepper
  • 1/2 T chopped fresh rosemary

Cut two 12 inch long sections of foil, and divide veggies between them. Drizzle each packet with olive oil and sprinkle the crumbled turkey bacon on them. Season with salt, pepper, and rosemary.
To fold packets, bring up the two sides of the foil and double fold leaving room for heat to circulate inside the packet as it cooks. Then, double fold each end to form the packet. Grill for about 10-12 minutes over medium heat, until veggies are tender.

Once I got the couscous all set to steam and had thrown a couple of Pillsbury dinner rolls in the oven I went outside to grill. All in all the meal took about 30 minutes from start to finish, with clean simple flavors throughout.

I’m really getting into throwing a few simple flavors together and seeing how it goes, and this meal was definitely a success. And… I’m sort of tempted to expand my herb garden a little more to see what other combinations I can come up with, although, I suspect, there is a lot more I can do with what I have. I guess well have to wait and find out. : )

Monday, May 18, 2009

I think I missed my calling...

You know how I always say I’m not into baking? Well I think maybe I should change my mind about that and start selling cakes to people. Seriously. You know that shoe cake I made back in December? I totally put it to shame with the cake I ended up designing and decorating for my sister’s graduation party last week.

Really, my mom was supposed to decorate it (she did all the baking last Monday) but I happened to be home sick with a really bad headache on Tuesday, and since I was home in the evening because of that, I offered to help her with coloring the fondant. I guess it was the least I could do, since I had dreamed up this monstrosity of a cake, in a style completely different from most of the cakes that she does. And then, it went from me helping, to me decorating and putting together the whole thing.

My idea was to make a topsy-turvy, whimsical cake that would really stand out. I started by googling some images of similarly shaped cakes. These are what I found:
I decided that three tiers would work out well… and as for the design and color scheme on it, I wanted it to look similar to the invitation I designed for the occasion:
So I sent over the images and design to my mom… and like I said, I happened to be home and offered to help. Well it quickly went from me helping, to me doing the entire thing! I started out by layering and shaping the cakes. Basically, I used three cakes for each tier- layered them with frosting (it was cream cheese frosting- to go with the carrot cake my sister requested) and then began shaping them. I started by angling the top of the tier, and once that was done, angling the sides, so in the end it was shaped like this:
The only thing you have to be careful of is that each tier above the bottom tier has to be angled on the bottom as well- and angled in the opposite direction of the top angle.Then I colored the fondant- I wore gloves this time! Basically, you just put a couple drops of icing color in it, and then knead it in until it is uniform. Then, I rolled it out and began laying it over the cakes and smoothing it.Once all three tiers were covered, my mom began explaining how to support the layers. Each cake is on a cakeboard, cut precisely to match the bottom edge of each cake, and that gets placed on four wooden dowel rods that are inserted into each of the bottom two layers- you have to trim the dowel rods to be the exact height of the cake they are in. Once all of your layers are in place, you use a dowel rod that has been sharpened with a pencil sharpener on one end, and carefully insert it straight down through all the cakes. You can see the end of it sticking out of the top of my tiered cake in this photo.Once that was done, I began cutting flowers and other decorations out of sheets of rolled fondant using an x-acto knife. Little by little, I built up my design.This is what it looked like in the end:For the party, we topped it with some fresh flowers in matching shades of white and bright orange. And as an added bonus, everyone asked my mom “Dilphia, you made that?” when they saw it, to which she surprised them by saying “Nope, Brenda did!”

Now, I want to make more cakes!

Tuesday, May 5, 2009

Summer's Coming!

With the weather getting warmer (although not drier) lately, I have been getting the itch to grill. The only problem with that is, I don’t actually own a grill. I’m thinking of getting one of those small tabletop style grills they sell at places like Target and Walmart, but I haven’t actually bought it yet.

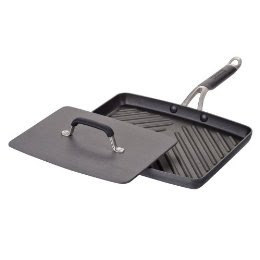
But, I do have a grill pan, something I use almost everyday in my kitchen. I’d even classify it as an “essential,” along with my Furi knives and a selection of other things I’m obsessed with. I use it to cook chicken and fish, turkey bacon, grilled cheese and other hot sandwiches, burgers, etc. The trick is to get it hot enough so that you cook each side of whatever you’re making for a few minutes, long enough to cook through and get some nice grill lines, while not so long that it burns or overcooks. And since the one I have is non-stick, cleaning it is always a breeze. The one I have was a Christmas gift from my mom, and is made by Kitchen Essentials from Calphalon (only at Target) and can be seen here. It’s even on sale this week, for $33.99.

Aside from the food described above, there are a couple of recipes I’ve made in the past couple of weeks that center around the fact that they are grilled. One is Tequila-Lime Chicken and Shrimp Fajitas, and the other is Coconut Curry Chicken Kabobs.

TEQUILA-LIME CHICKEN AND SHRIMP FAJITAS

Marinade
  • 1 cup good quality tequila, I like Jose Cuervo
  • 1 cup orange juice
  • juice of 3 limes
  • 2 T extra-virgin olive oil
  • 2 cloves of garlic, minced
  • 1/4 cup sliced green onions
  • salt and pepper, to taste

  • 2 large chicken breasts, cut into bite-sized strips
  • 1 pound of peeled and de-veined raw shrimp
  • 2 large peppers, one red and one green
  • 1 large Vidalia onion

  • about 20 fajita sized flour tortillas
Fajita Toppings
  • sour cream
  • guacamole
  • salsa
  • shredded cheese
  • sliced green onions
Mix the tequila, orange juice, lime juice, olive oil, garlic, green onions, salt and pepper together for the marinade. Pour about 2/3 of it over the chicken in a bowl and cover. Pout the rest over the shrimp in another bowl and cover. Place both bowls in the fridge for at least one hour… but, the longer, the better! Slice the onions and peppers while the chicken and shrimp are marinating. Heat grill pan coated with non-stick cooking spray over medium heat, and begin grilling onions, peppers, chicken and shrimp in batches (or you could do what I did and use TWO grill pans -one belonged to my mom- AND a two-burner sized griddle pan, I had the ENTIRE stovetop covered!) The onions and peppers are done when they have some grill lines, but are not cooked so much that they are soggy. The chicken should be cooked through, with no pink, and the shrimp take just a couple of minutes on each side. As you finish a batch, cover it with foil to keep warm. Warm the stack of tortillas in the microwave for about one minute.

I served these family-style for my, my mom and dad, sister, her boyfriend, and my neice, with the chicken, shrimp, onions and peppers on big platters on the table, right along side all the toppings (FYI- best store brand guacamole ever is Wholly Guacamole, it comes in sealed plastic bags that you can freeze and defrost whenever you need them)The marinade, which I pretty much just threw together with a few things I thought would be good together, worked out great- you could taste both the tequila and lime flavors, without being overpowered by them. My sister’s boyfriend, Ben, even messaged me the next day saying “I want more fajitas.” And, it’s a really fun meal to share with good friends and family.

The next recipe, Coconut Curry Chicken Kabobs, has similar ingredients (chicken, peppers, and onions), but a totally different flavor, and is SOOO easy.

COCONUT CURRY CHICKEN KABOBS
  • 1 pound of chicken breast, cut into chunks
  • 1 large green pepper, roughly chopped
  • 1 large Vidalia onion, roughly chopped
  • 1 cup coconut milk
  • 3 T curry powder
  • 1 T garlic powder
  • 1 T sugar
  • salt and pepper, to taste
  • bamboo skewers

Put chicken, onions and green peppers onto the skewers.
Make the marinade by combining coconut milk, curry, garlic powder, sugar, salt and pepper. Pour over the kabobs in a deep, rectangular storage or marinating container. Put in fridge, flipping halfway through marinating time to ensure that each skewer can soak in the marinade, for at least one hour. Heat grill pan over medium high heat, and place kabobs on, cooking in batches. Cook for about 4 minutes on each side.
I made these for my sister one Sunday night and we ate every last one. They are good! Coconutty and spicy, with just a hint of sweetness. TRY THEM!!!

Of course, either of these recipes can be made on a traditional, open flame grill, but if that’s not an option, a grill pan on your stovetop works just as well.